Making bead bracelets is a fun and easy way to create unique and stylish accessories. They are perfect for people of all ages and skill levels. With a few basic supplies and some simple techniques, you can create beautiful bracelets to match any outfit or mood.
This comprehensive guide will take you through everything you need to know about making bead bracelets, from gathering supplies to choosing the perfect clasp and tying finishing knots. So, grab your beads and get ready to unleash your creativity!
Supplies You’ll Need
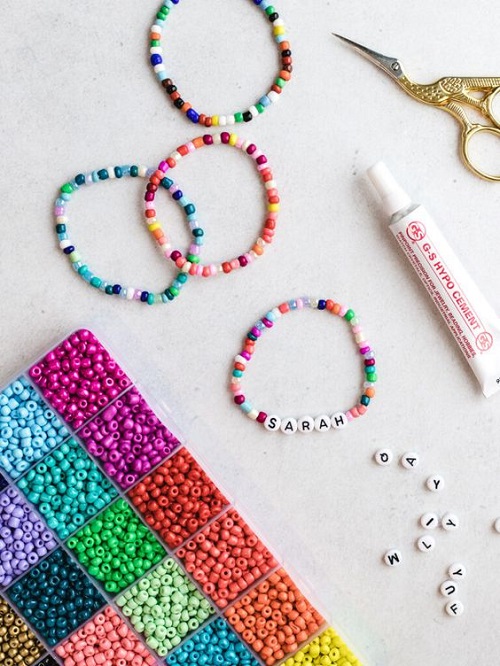
Before you dive into creating your masterpieces, let’s gather the necessary supplies. Here’s a list to get you started:
Beads:
There are countless bead varieties available in terms of size, color, material, and shape. Choose beads that suit your style and project!
Elastic cord:
Elastic cord comes in different thicknesses. Consider the weight of your beads when choosing the right thickness.
Scissors:
You’ll need scissors to cut the elastic cord.
Optional:
Clasp, measuring tape, crimp beads (for use with clasps), needle (for certain techniques)
Choosing the Right Beads
The beauty of bead bracelets lies in the vast selection of beads available! Here are some factors to consider when choosing beads:
- Size: Seed beads are small and great for detailed designs, while larger beads create bolder statements.
- Material: Glass, plastic, wood, and metal are all popular bead materials. Each offers unique aesthetics and textures.
- Shape: Round beads are classic, but there are also pony beads, cube beads, and many other shapes to explore!
- Color: Consider your outfit, personal style, or even a special occasion when selecting bead colors.
Types of Bead Bracelet Techniques
There are many ways to create bracelets. Here are a few popular techniques to get you started:
-
Simple Loop Stitch: This is a great beginner technique. Thread beads onto the elastic cord and loop the cord back through the first bead to create a continuous loop.
-
Straight Bead Stitch: Thread beads onto the elastic cord in your desired pattern. This stitch is great for showcasing colorful or patterned beads.
-
Crimp and Clasp Technique: This technique involves using crimp beads and a clasp to create a secure closure for your bracelet.
Tip: There are many resources available online that showcase various bead bracelet techniques with visual aids!
Choosing Your Clasp (Optional)
Clasps are not always necessary for bead bracelets, but they can add a professional touch and make the bracelet easier to put on and take off. Here are some common clasps to consider:
-
Lobster Claw Clasp: A popular choice, offering a secure closure.
-
Barrel Clasp: Another secure option with a barrel-shaped clasp.
-
Slide Clasp: Easy to use, but may not be suitable for heavy bracelets.
Tip: The clasp size should correspond to the thickness of your elastic cord.
Let’s Get Beading!
Now that you have your supplies and chosen a technique, it’s time to start creating! Here are some general steps to follow:
- Measure your wrist. Cut a length of elastic cord about two inches longer than your wrist measurement.
- Thread your beads. Thread your chosen beads onto the elastic cord according to your desired design.
- Tie a knot. There are different knots for finishing your bracelet. The square knot is a common and secure choice.
- Attach a clasp (optional). If using a clasp, follow the specific instructions for attaching it to the elastic cord using crimp beads.
Congratulations! You’ve created your very own bead bracelet!
Spruce Up Your Skills!
As you gain experience, you can explore more advanced techniques like using a beading needle for intricate designs or incorporating multiple strands of elastic cord for a thicker bracelet.
There are also countless resources available online and in libraries that offer bead bracelet patterns and inspiration for all skill levels.
Making bead bracelets is a fun and rewarding hobby that allows you to express your creativity and create unique accessories. With a little practice, you can develop your skills and create beautiful pieces you’ll love to wear or share as gifts. So, happy beading!
Trying the Knot: Finishing Your Bead Bracelet
Tying a secure knot is essential to keeping your bracelet together. Here are the steps to follow for a common and secure knot, the square knot:
-
Make a loop with the elastic cord. Pinch the elastic cord to create a loop at the end of your threaded beads.
-
Slide the end of the elastic cord through the loop. This will create a new loop with two strands of elastic cord coming out of it.
-
Take the right strand of elastic cord and loop it under the bottom strand coming out of the larger loop.
-
Bring the right strand back up and through the larger loop. Now, the right strand should be coming out of the top of the larger loop.
-
Tighten the knot gently by pulling on both strands of the elastic cord. The knot should cinch down securely.
-
Repeat steps 3-5 one more time. Tying a square knot twice ensures a strong and secure closure.
Tip: For extra security, you can add a dab of glue to the knot after tightening it. Let the glue dry completely before wearing your bracelet.
Adding a Clasp (Optional)
While clasps are not always necessary, they can add a professional touch and make the bracelet easier to put on and take off. Here are the general steps to add a crimp and clasp closure:
-
Crimp beads: Slide a crimp bead onto the elastic cord, then fold the cord back onto itself to create a loop.
-
Clasp: Open the clasp and slide the loop from the elastic cord onto the clasp.
-
Crimping tool: Use a crimping tool to squeeze the crimp bead shut, securing the clasp to the loop.
-
Repeat steps 1-3 on the other end of the bracelet.
Tip: Choose a clasp size that corresponds to the thickness of your elastic cord.
Conclusion
Making bead bracelets is a fun and rewarding hobby that allows you to express your creativity and create unique accessories. With a little practice, you can develop your skills and create beautiful pieces you’ll love to wear or share as gifts. So, happy beading!