DIY necklace is a fantastic way to express your personal style and create unique jewelry. They’re perfect for beginners and experienced crafters alike. This comprehensive guide will equip you with all the knowledge and inspiration you need to design and craft your own stunning DIY necklaces.
Exploring DIY Necklace Techniques
There are numerous techniques you can explore in the world of DIY necklaces. Here are some popular methods to get you started:
Stringing:
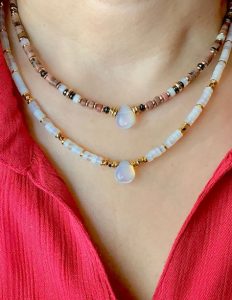
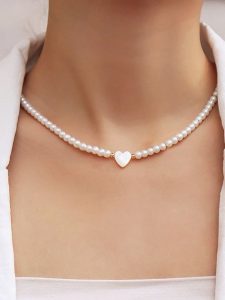
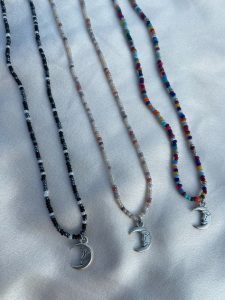
Stringing involves threading beads, charms, or other objects onto a string or wire. This is a basic technique that allows for endless design possibilities.
Knotting:
Knotting techniques like macrame and friendship bracelets add a touch of artistry and texture to your necklaces. These techniques can be simple or complex, depending on the desired pattern.
Wire Wrapping:
Wire wrapping involves wrapping craft wire around beads, gemstones, or other findings to create secure and decorative connections. This technique allows for organic and sculptural designs.
Clay Sculpting:
For a truly unique touch, sculpt your own pendants or beads from air dry clay, polymer clay, or oven-bake clay. Once cured, you can paint and embellish your creations.
Metal Stamping:
Metal stamping allows you to personalize your necklace with initials, words, or designs. This technique involves hammering metal blanks with letter or symbol stamps.
Essential Tools and Materials for DIY Necklaces
Before you dive into creating your masterpieces, gather the necessary tools and materials. Here’s a basic list to get you started:
-
Jewelry Pliers: Round-nose pliers, flat-nose pliers, and cutters are essential for opening jump rings, shaping wire, and handling various findings.
-
Chain or Cord: Choose a chain or cord in your desired length and material, such as metal chain, leather cord, or waxed cotton cord.
-
Clasps: Select clasps that match the style and weight of your necklace. Lobster claw clasps and crimp clasps are popular choices.
-
Beads and Findings: Explore a vast world of beads, charms, pendants, and other findings in various materials, shapes, sizes, and colors.
-
Scissors and Wire Cutters: Scissors are needed for cutting thread or cord, while wire cutters are used for trimming craft wire.
Choosing the Right Tools and Materials for Your Project
The specific tools and materials you’ll need will depend on your chosen technique. For instance, wire wrapping requires different pliers than stringing beads. Research your chosen technique to ensure you have everything you need.
Where to Find Inspiration for DIY Necklace
Sometimes the hardest part is getting started! Here are some ways to spark your creativity and find inspiration for your DIY necklaces:
-
Browse Online Resources: Websites like Pinterest and Instagram are treasure troves of DIY necklace inspiration. Search for terms like “boho necklaces,” “statement necklaces,” or “minimalist jewelry” to discover a world of ideas.
-
Explore Craft Stores: Craft stores offer a visual smorgasbord of materials and inspiration. Walk through the beading and jewelry sections to see what materials pique your interest.
-
Look at Fashion Magazines: Fashion magazines showcase the latest trends in jewelry design. Even if you don’t plan to replicate a specific design, these images can spark ideas for color palettes, materials, and design elements.
-
Take a DIY Necklace Workshop: Many craft stores and community centers offer DIY jewelry workshops. These workshops can introduce you to new techniques and provide a hands-on learning experience.
Tips for Creating Beautiful DIY Necklace
With all the inspiration at your fingertips, it’s time to bring your ideas to life! Here are some helpful tips for creating beautiful DIY necklaces:
-
Plan Your Design: Sketch or brainstorm your design idea before diving in. Consider the necklace length, style, color palette, and materials you’ll use.
-
Start Simple: If you’re new to DIY necklaces, begin with a simple project. As you gain experience and confidence, you can experiment with more complex techniques.
-
Don’t Be Afraid to Experiment: The beauty of DIY is there are no hard and fast rules. Experiment with different materials, techniques, and color combinations to find your unique style.
-
Safety First: Be mindful of safety when using sharp tools or working with wire. Always wear eye protection and use appropriate tools for the job.
-
Most Importantly, Have Fun! DIY necklace making should be an enjoyable and creative process. Relax, have fun, and unleash your creativity!
Here are some additional thoughts on the benefits of DIY necklaces:
The world of DIY necklace offers endless possibilities for self-expression and creativity. By exploring different techniques, materials, and design elements, you can craft unique pieces that reflect your personal style.
-
Affordable Creativity: DIY necklaces allow you to create beautiful jewelry without breaking the bank. You can find inexpensive materials at craft stores or even use recycled items from around the house.
-
Personalized Gifts: Handmade necklaces make thoughtful and unique gifts for friends and family. You can personalize them with the recipient’s favorite colors, birthstones, or initials.
-
A Sense of Accomplishment: There’s a great feeling of satisfaction that comes from creating something beautiful with your own hands. DIY necklaces allow you to experience this sense of accomplishment.
-
Stress Relief and Relaxation: Crafting can be a calming and therapeutic activity. The repetitive motions and focus required for DIY necklaces can help reduce stress and promote relaxation.
Whether you’re a seasoned crafter or a curious beginner, the world of DIY necklaces welcomes you with open arms. So, gather your supplies, unleash your creativity, and start creating beautiful and unique jewelry pieces that you can cherish for years to come!
Showcasing Your DIY Necklaces
Once you’ve created your stunning DIY necklace, it’s time to show it off! Here are a few ideas:
-
Wear Your Creation with Pride: The most rewarding part of creating your own necklace is wearing it! Admire your handiwork and flaunt your unique style.
-
Share Your Creations Online: Join online communities or social media groups dedicated to DIY jewelry making. Share photos of your creations and connect with other crafters.
-
Host a Craft Swap: Gather your friends and fellow crafters for a DIY swap party. Everyone can bring their creations to exchange, adding new pieces to your collection.
-
Display Your Necklaces: Create a stylish display for your DIY necklaces at home. A jewelry stand or a decorative wall hook can showcase your creations.
-
Gift Your Necklaces: Handmade necklaces make thoughtful gifts for friends and family. They show that you put time and effort into creating something special.
DIY necklace opens up a world of creative possibilities. With a little planning, exploration, and practice, you can craft beautiful pieces that reflect your unique style. So why not dive into the world of DIY jewelry making and express yourself through the art of the necklace?